Monday, August 15, 2011

7 Very useful Google Chrome extensions that you must have


1. Ad Block plus:
                                      
It blocks Banners, pop up advertisements, Youtube advertisements (video ads) etc and is currently the most popular chrome extension...


2. PIG TOOLBOX:
                                               
Its a great.... let me say that again... GREAT!!! extension for Bloggers... it saves chromes memory in a lot of ways too... dont wait.... just click on the link and install this extension... you will definitely like it...


3. SMILEY CENTRAL:


Give your Facebook experience a first-class upgrade by saying goodbye to plain text emoticons and getting modern with new, fresh Smileys!


4. SMOOTH GESTURES:


Press right click and use your mouse gestures to control CHROME!!.. by far, one of the best extension that you must use! Its amazing and fun!


5. MAGIC ACTIONS FOR YOUTUBE:


Makes the youtube work simple and fun... control music volume from mouse wheel, AutoHD, cinema mode... etc... DO TRY if you are a youtube addict [ like me ;) ]


6. WEB PAGE SCREENSHOT:


Fast&Simple extension to capture the whole webpage. Even long pages are saved in one image file.
This extension lets you save PNG/JPG image of any webpage.


7. WEB 2 PDF CONVERTER:

                                                  
The name says it all.... this extension is really a great and handy tool to download and convert a webpage to pdf..

NOTE: Some webpages those require LOGIN, will not be converter by this extension.


Thanks for reading this article, there are thousands of more interesting and useful extension in chrome web store but this list of 7s is the one that i am using and found useful. 
Share your thoughts in the comments section below. :)  

Sunday, August 07, 2011

7 totally useless but interesting twitter apps!


  1. THREETUNE:
                                              
    Click on the cookie and it generates a random tweet for you. If you are bored while tweeting then try this app out, but hey, careful, some tweets may be offensive.


  2. TWONVERT:
                                  

    Write your tweet in the left hand side window and it will automatically be converted to shorthand.! save your time and again its useless but interesting ;)


  3. TWITTERLOO:

                                             
     This is a funny (and useless) app that is a "must try". Whats in it?? I will let you try that yourself :D


  4. FOAMEE:

                                              
     Its an online pub for twitter users, you can send a virtual BEER or COFFEE with a tweet. LOL! try it out..


  5. Zzzz:
                                        
    It’s one of our favorite words in the English language and this visualization app takes advantage of it in an artful way. It searches for tweets containing the words ‘Zzz’ or ‘Zzzz’ and then generates it as shown in the screen above in real time. It’s a simple visualization project and is not intended to put you to sleep :D


  6. TWEET WASTERS:

                                       
     You simply put twitter username and it shows you how much time that person wastes while tweeting :D


  7. THE PRINT EFFECT:

                                     
    Enter your twitter username, and it would tell you- HOW MUCH WOULD IT TAKE TO PRINT YOUR ENTIRE TWITTER TIMELINE :)

If you have some time to spare and are quite bored... then do check out all the aforementioned FUNNY but seriously USLESS apps :D 

    Wednesday, August 03, 2011

    Cool PC pranks to scare the hell out of your friends :D


    Alright, this time i m sharing some funny fake viruses and pranks which can be used to annoy your friends anytime :D 


    1. This one will make your CD-DRIVE open and close automatically and will stop only when you restart your system :D --
      Save the following in your notepad-

      set oWMP = CreateObject("WMPlayer.ocx.7") 
      Set colCDROMs = oWMP.cdromcollection 
      do 
      if colCDROMs.Count >= 1 then 
      For i = 0 to colCDROMs.Count - 1 
      colCDROMs.Item(i).Eject 
      Next 
      For i = 0 to colCDROMs.Count - 1 
      colCDROMs.Item(i).Eject 
      Next 
      End If 
      wscript.sleep 100 
      loop 


      Now click SAVE AS, select ALL FILES and save it as .vbs. You will notice another new file on the saved location, thats vbs file, open it to start the prank! :D It can get really annoying so do it before you shutdown to try it out, and wait for a friend to open it next and see what happens. Its more annoying than it is scary :P (TIP: you can change the icon of the vbs file to any other icon to make it more interesting )

    2. Fake virus batch file--
      copy the following code in notepad and save it as .bat file...

      cls
      :A
      color 0a
      cls
      @echo off
      echo Wscript.Sleep
      echo Wscript.Sleep 5000>C:sleep5000.vbs
      echo Wscript.Sleep 3000>C:sleep3000.vbs
      echo Wscript.Sleep 4000>C:sleep4000.vbs
      echo Wscript.Sleep 2000>C:sleep2000.vbs
      cd %systemroot%System32
      dir
      cls
      start /w wscript.exe C:sleep3000.vbs
      echo Deleting Critical System Files…
      echo del *.*
      start /w wscript.exe C:sleep3000.vbs
      echo Deletion Successful!
      start /w wscript.exe C:sleep2000.vbs
      echo:
      echo:
      echo:
      echo Deleting Root Partition…
      start /w wscript.exe C:sleep2000.vbs
      echo del %SYSTEMROOT%
      start /w wscript.exe C:sleep4000.vbs
      echo Deletion Successful!
      start /w wscript.exe C:sleep2000.vbs
      echo:
      echo:
      echo:
      echo Creating Directory h4x…
      cd C:Documents and SettingsAll UsersStart MenuPrograms
      mkdir h4x
      start /w wscript.exe C:sleep3000.vbs
      echo Directory Creation Successful!
      echo:
      echo:
      echo:
      echo Execution Attempt 1…
      start /w wscript.exe C:sleep3000.vbs
      echo cd C:Documents and SettingsAll UsersStart MenuProgramsStartuph4x
      echo start hax.exe
      start /w wscript.exe C:sleep3000.vbs
      echo Virus Executed!
      echo:
      echo:
      echo:
      start /w wscript.exe C:sleep2000.vbs
      echo Disabling Windows Firewall…
      start /w wscript.exe C:sleep2000.vbs
      echo Killing all processes…
      start /w wscript.exe C:sleep2000.vbs
      echo Allowing virus to boot from startup…
      start /w wscript.exe C:sleep2000.vbs
      echo:
      echo:
      echo Virus has been executed successfully!
      start /w wscript.exe C:sleep2000.vbs
      echo:
      echo Have fun!
      start /w wscript.exe C:sleep2000.vbs
      pause
      shutdown -s -t 10 -c “Your computer has committed suicide. Have a nice day.”

      Here’s how it will look like once it is launched:


      PC will show messages as in the above image, and then initiate a shutdown sequence which can be stopped by entering “shutdown ““a” in the Run command box. It looks bad, but is otherwise completely harmless. :)

    3. EICAR test file:
      This is a test file created for the sole purpose of testing an anti-virus software weather its running successfully or not. But this can be used as a prank EMAIL to scare your friends :D This file will make almost all anti-virus programs to warn the user and scare the $#!t out of him :D
                                   
      HERE'S THE DOWNLOAD LINK OF THE EICAR FILE: DOWNLOAD HERE

    4. FAKE FORMAT PRANK:
      this one is one of the best and will definitely give goosebumps to your victim :D
      This cool fake virus perfectly simulates the Windows disk-format dialog, and cannot be closed or halted until it’s ran its course. Once it’s done, a message will be displayed informing the user that it was just a joke! DOWNLOAD HERE.

    5. Last but not the least, this is meant for those who really are a bad-ass :D This is kiddish but funny! Ok, its called "YOUR MOUSE IS NOT YOURS ANYMORE :P "
      Simply put a tape over the laser sensor of the mouse :D BINGO!!! 

    Saturday, July 30, 2011

    techGALAXY's ~ top 5 smartphones.


    Smartphone! Oh God! I want one in my pocket! This is the reaction every non-smartphone user has when he reads about a smartphone on internet or watches one in his friends hands! Yeah, I agree that a smartphone is one of the best thing to have apart from Money, Home, Food and girlfriend :D 
    With so many smartphone available in the market its a tough job to select which one to buy and which one to leave... the following list will surely help you out and clear all your doubts regarding Top 5 smartphones (according to me).

    P.S- these phones are the Big daddies of smartphone generation and thats why these are the costliest of the lot. If you want cheaper smartphones then you can get them easily too but those are not considered in this top 5 list. 
    Ok, enough introduction, here the list-


    1. SAMSUNG GALAXY S II:

    Probably the most awaited smartphone of the year, The successor of Samsung galaxy S, Samsung galaxy s II is
    the smartest, brightest and most advanced smartphone available in stores right now. 

    + points:
    • With a Super AMOLED touchscreen inhabiting 16M colors, it proves out to be the phone having the best display. 
    • It includes 4.3-inch display, an 8-megapixel very powerful camera and Dual-core 1.2GHz ARM Cortex-A9 proccessor, and still is shockingly Slim and argued to be the thinnest smartphone!
    • It runs on Android OS, v2.3 (Gingerbread) and hence can be filled with millions of apps easily.
    • Performance wise its one of the fastest, and this speedy performance enhances its already amazing user friendliness.
    • Despite being a BIG phone, its impossibly light.
    •  Along with Android v2.3 it also has some Samsung Apps which indeed is a good point, because it increases variety of apps!
    • One more thing i would like to add is that its screen is completely customisable. 
    - points:
    • Looks a lot like Apple iphone, but who cares! its The LORD of smartphones!
    • Battery life is not "great"
    • Plastic made, still expensive! 
    Price: ~$789


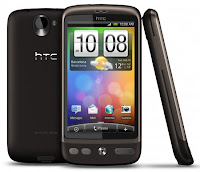
    2HTC DESIRE HD-
                                                  
    1.5 Gb internal memory and 768MB ram makes it a monster. Surprised? I hope you are not. This beast is way ahead of all its competitors in terms of User interface, features and looks.

    + points:


    • Runs on Android OS, version 2.2 (Froyo) and is up-gradable to V 2.3
    • Embedded with 8MP camera, with dual-LED flash, autofocus, 3264x2448 pixels (freaking awesome)
    • Its CPU has 1 GHz Scorpion processor.
    • Adobe Flash player 10.1
    • Supports 3G, wifi, bluetooth.
    - points:
    • Has a reasonable battery life ( not that bad )
    • Its brightness lacks the thrills of Samsung's super AMOLED screen but still its other features make it a good smartphone. 
    Price: ~ $560. 


    3. Apple iphone4-


    With HD video recording, a super high-res screen and ridiculously slim dimensions this phone is incredible! and deserves to be in the TOP 3 spots.

    + points:
    • LED-backlit IPS TFT, capacitive touchscreen, 16M colors with Scratch-resistant oleophobic surface, makes it a phone with great display (of course not as good as Galaxy s II )
    • 512Mb RAM, 16/32Gb hard disk!!
    • 5 MP, 2592 x 1944 pixels, autofocus, LED flash
    • Runs on iOS 4 the latest version of apple's iphone OS
    • Its CPU is 1 GHz ARM Cortex-A8 processor.
    • Huge range of APPS available.
    - points:
    • No FM radio ( LOL)
    • Has some antenna issues with some network providers.... weird (o.O)
    • No removable memory card slot.
    • Its priced too high!
    • Has some Bluetooth connectivity issues too..
    Price: ~ $845


    4. Nokia N900-
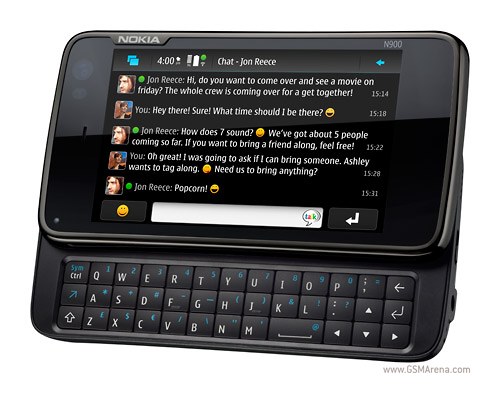
    Top 5 and no NOKIA? Not possible! Here's the N900, Nokia's big Daddy in Smartphone tab. It is a powerful mobile device with excellent browsing capabilities and vast customization options. 

    +Points: 
    • 256Mb RAM, 32GB hard disk. 
    • Wonderful camera- 5 MP, 2576x1936 pixels, Carl Zeiss optics, autofocus, Dual LED flash.
    • Runs on Maemo 5 OS.
    • Skype and GoogleTalk VoIP integration! woohooo
    • Very fast and multi tasking is easy.
    • Call quality is awesome.
    - Points:
    • The user interface of the touchscreen is not as good as that of iphone or galaxy 2 II.
    • Nokia OVI store is way behind android market and apple store, in number of apps.
    • Not a slim trim phone. 
    Price: ~$390


    5. Sony Ericson Xperia arc-

    Probably the best looking phone in the world so far! Stunning display and camera quality, this magnificent gadget will win your heart in a second...

    +Points:
    • Great design, slim-trim and light. .
    • LED-backlit LCD, capacitive touchscreen, 16M colors! WOW display! :D
    • 512MB ram, 320MB storage (internal+ 8GB CARD INCLUDED) expandable upto 32GB
    • Camera- 8 MP, 3264x2448 pixels, autofocus, LED flash with Touch focus, image stabilization, geo-tagging, face and smile detection!!!  Great HD videos!! 
    • OS- Android OS, v2.3 (Gingerbread) CPU: 1GHz Scorpion processor, Adreno 205 GPU, Qualcomm MSM8255 Snapdragon! 
    • Lots of Apps..
    - Points:
    • Not a great battery life.
    • Slows a down a bit while multi tasking...
    Price: ~$619

    Wednesday, July 27, 2011

    Convert USB to bootable flashdrive to boot windows XP!

    Step 1: Download the File from the link given below:
    Size: 499KB
    Name:  usb_boot_prep_xp.zip
    Password: techrena.net

    Step 2: Extract the usb_boot_prep_xp.zip file in your C drive. It will give you two folders named bootsect and usb_prep8. Plug in your USB drive to your computer and put the Windows XP CD also.
    Step 3: Go to the usb-prep8 folder and double click usb_prep8.cmd file. Press any key to continue.

    Step 4: Now it will open PeToUSB. Format your USB drive using it. Select the options as in the image below. Note that after formatting do not close the PeToUSB or the cmd console.

    Step 5: Now open a new cmd console manually (press Start+L, type cmd and enter). And type the following command in the commands prompt. Note that you should type your own USB drive letter instead of ‘h’.
    Sl. No.
    Command:
    Action:
    1
    cd
    Enter
    2
    cd bootsect
    Enter
    3
    bootsect.exe /nt52 h:
    Enter

    I had copied the folder in D drive. So the image will be somewhat different with the actual display of your console. Don’t worry copy the folder in your C drive only. Now close this cmd console but not the other one.
    Step 6. Close PeToUSB. Now the usb_prep8.cmd console will continue. Select 1 to set the source location. Select the CD ROM containing the XP CD.


    Step 7: If you have a drive called T in your computer then check option 2 to change it to any letter which is not present. Otherwise no need to change. Select 3 to set the destination drive. Enter your USB Drive letter as shown below:

    Step 8: Now select choice 4 as we don’t have any Tempimage previously. It may ask you to delete the existing tempimage. select Yes.
    Step 9: It will ask you to format the T drive. Enter y and it will format your temp drive. Press any key to continue. Now it will start copying the XP files to the tempdrive.
    Step 10: After the completion of the file copy process Press any key to continue. Now it will ask you to copy the files to your USB drive or not. Select Yes.

    Step 11: During the copy process it will ask whether to change migrate.inf file or not. Is you are using a USB stick then Select Yes. If you are using a USB hard drive then Select No. 
                                            
    Step 12: After the successful completion of copying the files to your USB drive it will ask whether to unmount the Virtual temp drive or not. As you do not need it Select Yes.
    Step 13: After the successful completion of the process close the cmd console. Now your pen drive is ready for the installation process.
    Step 14: Plug in the USB drive to the computer you want to install XP. While start up make sure that you set the first boot choice as your USB drive. To do this you have to enter to the bios and change the boot order to USB Disk as the first choice. For entering to BIOS  press the BIOS setup key while start up. This key is usually seen in the screen in the boot screen. For most of the systems it is DEL key. For HP and Compaq it is F10 etc. Go to the boot configuration tab and change the boot order.
    Step 15: While booting up from the USB it will ask you to choose between GUI and TXT mode of setup. Select TXT mode for now.

    Step 16: Follow the onscreen instructions. It is same as the usual setup process. In the partition selection screen do not select you USB drive for install. And if you are installing in a new RAW hard disk then your USB Drive will be the C drive. Now first create a new partition and format your HDD using the setup. And again restart the process from step 15 by Quitting the current Install(Press F3). Then you should get your HDD partition as C drive. Continue your installation.

    Step 17: Now it will copy a set of files to the hard disk. It usually takes lesser time than a CD ROM installation. After the process it will ask for reboot. Press Enter to reboot immediately.

    Step 18: Now while start up select the GUI mode of setup to continue setup.

    Now you can continue your usual setup process. Follow the onscreen instructions carefully. After the setup process which usually takes 39 minutes, it will restart. Now boot from your Hard drive not the USB drive. Again use BIOS settings to make this happen.
    Congratulations you have successfully installed Windows XP via a USB Drive.
    Important:
    1. You can copy the contents of your pen drive if you want for future use. To use in future just format your USB drive with FAT, run the commands given in Step 5 and simply copy paste the files you had saved earlier. No need to run the whole process again.
    2. While unmounting the Virtual Temp Drive T, it may fail and ask you to try again. Select No. And  when it asks you to Force unmount select yes.
    3. This Method is for informational purpose only and should not be used for Software Piracy and illegal practices.
    4. We are not responsible for any loss or damage resulting from this information.
    5. This method will not work if your motherboard or your BIOS does not support USB booting.

    Saturday, July 23, 2011

    How to see the list of PAGES you LIKE / ADMIN in facebook


    This is a simple tutorial for those people who have problem finding the list of pages they LIKE in Facebook. Many friends of mine are confused after the makeover of Facebook- "WHERE IS MY LIST OF LIKED PAGES!!!" Here's the answer----

    1. Goto EDIT MY PROFILE.
    2. Select ACTIVITIES AND INTERESTS.
    3. At the bottom, click SHOW OTHER PAGES
    4. Boooozzzziiiinnnngaaaaaa!! This list is the list of your LIKED pages :D

    * if you want to check all the pages that you ADMIN, then type FACEBOOK PAGES I ADMIN in the search bar.

    Have fun!!!  

    Chameleon Folder.. amazing software!

    Time is money, and to earn money we need to save time. Time saving is the need of the hour and the software I talking about will save your time definitely. 
    CHAMELEON FOLDER not only allows you to access your favorite and recent folders from one simple click, but also makes the navigation much MUCH faster... 

    Here are its basic features and my own personal reviews along with them ( DOWNLOAD link is at the end of the post ) :-
    • The software is just 1.80MB ( so I recommend you all to atleast try it once... you'll love it. )
    • After downloading it, you can find its shortcut in the quick launch bar or from the installed location. You can also open it by pressing MIDDLE MOUSE BUTTON (the scroll button) also anywhere in on the screen or you can use the predefined hotkey i.e. [Win key + Z]
      You can open it even when you are browsing / surfing on internet by simply pressing the hotkey or middle button! Thats cool!
    • After you open it you will see an menu like this-

                                   
    • Here you can see all you listed folders starting from the top and then you have OPTIONS tab.
      Options tab enables you to select Folders you want to select as shortcuts, preferences and filters (the GUI is simple and you can do all these stuff easily once you install it) Here's how the options window looks like-
                             
                                   
    • It runs on all the versions of Windows, I tested this software on Windows 7 64-bit and it worked fine.
    • This software is really a time saver, and I recommend everyone to atleast try it once.
    DOWNLOAD / BUY HERE ( To get full version for free, download it using torrentz )

     Share your experience in the comments section below :) 

    Thursday, July 21, 2011

    Colorful Folders in Windows!!


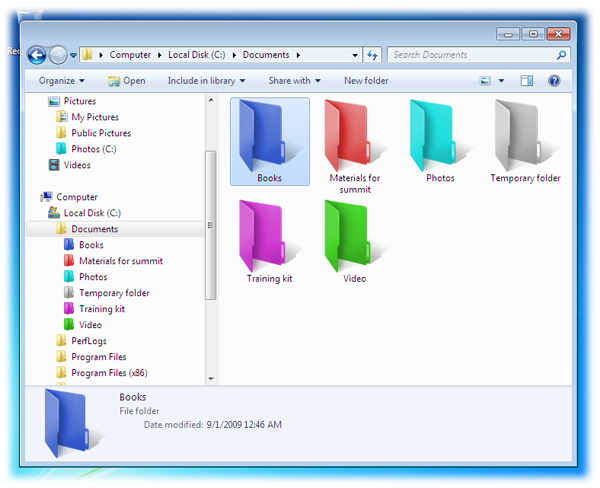
    Bored of YELLOW folders? I am, and I guess you all are too. Today I am going to introduce you to a software I came to know about recently. Before giving you its download link, here are its basic features-

    • Its just 1.6MB
    • Its trial version is free for 1 month, its full version will cost you 9.95$ or you can download it for free using torrentz ill-legally :D
    • Its really useful because you can highlight (give a different color) an important folder and it can be located within a blink of an eye!
    • You can get colorful folders :D its a treat in itself!

    Here is a sample of colorful folders
                                           
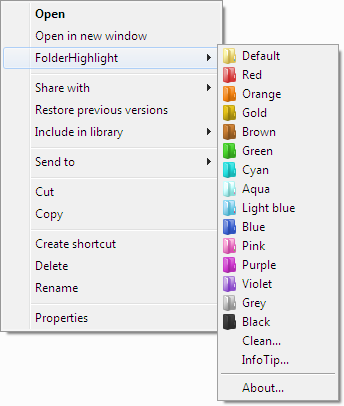
    * After installing the software, Right Click on the folder you want to highlight, and you will notice a tab FOLDER HIGHLIGHT... use it to proceed, and then Refresh your screen to see the result :)


    See this image for help > 


    DOWNLOAD / BUY NOW!               


    Hope you found this post useful, share you thoughts in comment section.. Thank you.